


How To Pick The Right Tent For YOU
Before you actually start picking a tent, take a moment and think about why you want a tent in the first place. . . .
Recently, some of the crew from EasternSlopes.com paddled our kayaks to “Fern Island.” Once there, we unloaded the kayaks, pitched our tents, tidied up the campsite, and then went about enjoying the rest of our day. Some of us paddled more, visiting a waterfall that tumbles into the river nearby, some fished, most of us swam (briefly) in the chilly water, and, of course, we napped.
In the cool of early evening, we picked fiddlehead ferns and wild mushrooms, which we sautéed and ate along with chicken and roasted sweet potatoes cooked over an open fire. After dinner, we sat in our camp chairs, sipping wine, and enjoyed the sights and sounds of night coming on: sunset colors, birds moving and calling in the evening light, stars popping out overhead, frogs beginning their evening chorus. Later, we settled into our tents for a long, deep, restful sleep.

Breakfast was a huge pan of scrambled eggs and chicken sausage. Then it was time to pack up, load the kayaks and paddle back to “reality.”
In all, it was a wonderful getaway, a total change of pace from the stresses of everyday life and work. Camping is like that. All the details will change with the seasons and locations, of course, but the one thing that made this and many other similar getaways possible was a tent, or, more accurately multiple tents, one for each couple.
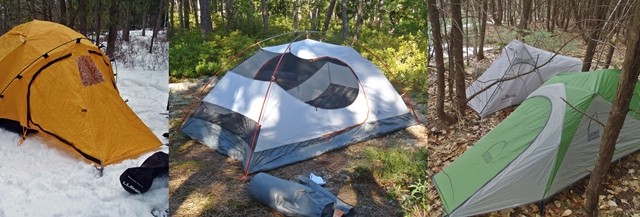
Simply owning a tent opens up new worlds. Whether you carry it in your motor vehicle, in a backpack, on your bike, or in a canoe or kayak, a good tent creates a comfortable, dry, bug-free home. There are hundreds of tents on the market. Some of course, are better than others, and some are better FOR others; there are many different tents because there are many different needs. Getting the right tent for YOU requires several steps. Here’s how to go about it.

How To Pick The Right Tent For YOU: Some Basics To Start
Most modern tents have a floor of waterproof, coated fabric that will typically extend several inches up the sidewalls of a tent body made either of a breathable fabric with mesh-covered windows for additional ventilation or completely of mesh for even more ventilation. Camping in New England in the late spring and summer, both the ventilation and the insect protection afforded by the mesh is absolutely essential.
Over the whole structure goes another layer of waterproof material called a “fly.” On most tents, the fly and tent are separate, so you can leave the fly off on a dry, clear night and enjoy the stars as you lie in bed. But some tents have fly and tent body permanently attached. These are usually quick and easy to set up in the rain.
It’s important to have at least some air circulating between the tent fly and the tent body—otherwise the vapor from your breath will condense on the fabric of the fly as the night cools and you can create your own miniature rainstorm (or snowstorm!) right inside the tent. Condensation is the reason you can’t just build a whole tent out of waterproof fabric.

Step 1: Choose A Season While the lines aren’t at all precise, tents basically fall into three categories: summer, 3-season, and winter/expedition/mountaineering.
Summer tents are usually lighter, feature lots of mesh screening for insect protection and ventilation. They are designed so they keep out rain and withstand typical summer breezes, but still encourage a lot of air circulation through the tent. With some tents, the doors are designed to catch breezes and pull them through the tent, taking advantage of the slightest breath of air on a hot summer evening.
Three-season tents are somewhat sturdier, to withstand more wind and rougher weather, and even a moderate snowfall. In the “olden days” a 3-season tent was defined by a breathable fabric body with mesh panels or zip-open, mesh-covered vents. In the reality of today’s world, it’s getting harder and harder to find a 3-season tent that fits that definition. In fact, most tents labeled 3-season by manufacturers show many of the design characteristics of summer tents–particularly the light weight and use of lots of mesh in the tent body. This is because modern tent poles are stronger than ever, and when coupled with tensioned designs, the latest summer tents easily handle late-fall and early spring conditions. These days, with improvements in synthetic insulation sleeping bags, it’s often easier and cheaper to have multiple bags and match them to prevailing conditions rather than own multiple tents. But in rough weather, a breathable fabric body protects you better than mesh. For an example of a true 3-season tent, engineered specifically for extending your camping season, look at the REI Arete ASL.
A 3-season tent doesn’t circulate air as well as a true summer tent, or button up as tightly in bad weather as a winter/expedition/mountaineering tent, but it’ll handle a wider range of conditions, especially in early and late winter.
Winter/expedition/mountaineering tents are heavier yet, built to withstand the high winds and heavy snowloads of alpine environments. Typically, they’ll have more poles than summer or three-season designs. The fly is usually closer to the tent to provide an insulating air space (venting moisture isn’t as critical in dry winter air or at higher altitudes). These are specialty tents, and often come with sticker-shock price tags. The extra weight, reduced ventilation, and higher price tag means these are not the best choice for anyone wanting a one-tent solution; few campers ONLY go out in the winter.
For most people, a summer tent, (May through October in New England) is all they need. However, if you’re someone who likes to push the envelope a bit, and might want to get out in April or November, a 3-season tent means a little more weight to carry, but a lot more security if a random, unforecasted edge-of-season snowstorm comes in and dumps 6 inches (or 26 inches, as happened to two ES staffers one Halloween) of wet snow on you.

Step 2: Imagine Uses Are you going to be camping exclusively from a car or a canoe? If so, you can get away with a heavier/larger tent. If you’re backpacking, biking or kayaking you’ll generally want a tent that’s lighter and more compact. Just remember, a tent that will work for backpack, bike and kayak camping can also work for car and canoe camping, but you probably can’t backpack a big, heavy, car camping tent.
If you bushwhack into the wild woods and pitch your tent wherever you can find a flat spot, you are going to need a tent with a smaller footprint than you will if you always camp in established campsites along trails, waterways and roads. When in doubt, our advice is to go for maximum versatility. You may never use the tent in every way you can imagine, but it’s better to have that scenario than to have a dream trip appear and realize that your tent won’t work for it.

Step 3: Pick A Size Tents come in all sizes from tiny solo shelters to huge cabin tents. Our bias is generally toward the smallest, lightest tent which offers adequate usable space and comfort for the situation, though we admit we love BIG tents for car camping.
Tents are usually designated by the number of people they can theoretically hold in reasonable comfort. Theoretically is the key word here. A better description might “How many people can cram inside in a pinch.” If weight and finding enough open, level space to pitch a tent aren’t issues, we generally recommend “sizing up.” Obviously, larger tents offer more room for people and gear, and both are nice, especially if the weather isn’t cooperating. A small two-person tent is luxuriously large for a solo traveler, and three-person is a palace for two.

If those two previous paragraphs seem to contradict each other, it’s because there is no such thing as “perfect” in the world of tents. Instead, you are trying to find the right balance of weight and space for your particular situation, And with all the tents on the market today, chances are you can find the right size and shape that will work perfectly for you–at least most of the time.
A true solo tent—designed for one person only—can be surprisingly comfortable and versatile. Tiny tents fit in smaller places and in our woods, it’s often difficult to find a place to pitch a larger tent. If you always travel alone, a solo tent can be a great choice as most of today’s solo tents offer plenty of room for one person and some gear.
But here’s a secret. When traveling with a friend, two solo tents are more versatile than one two-person tent; they’re both easier to pitch and allow you more privacy. One person can sleep while the other reads, for example. They’re also easier to pack; smaller tents fit into packs better than great big ones. But two solo tents are usually a little heavier than one two-person, so it’s a tradeoff.

Some smaller “two-person” tents are really best for one person, but will sleep a friendly couple in reasonable comfort. For couples who always travel together, consider either “two-plus” tents, (roomy, two-person models) or lightweight three-person tents. For groups of three or more, multiple smaller tents are always more versatile than bigger, heavier, bulkier four- or six-person models.
If you’re having trouble making a choice, go with an added few ounces and a little larger tent: more space can sometimes equal more comfort and better sleep, and you are likely to use a tent more if you are comfortable and sleep well in it. The lightest, most expensive, loveliest tent isn’t much fun if it stays in the closet at home!
Step 4: Select The Right Features For You

This is where things get a bit more complex as you try to balance a variety of factors, including where you camp, how much time you spend in your tent, how many times a year you are likely to use your tent, and how much you can afford to spend. Only you can decide what’s most important for you.
If you possibly can, actually get inside a tent before you buy it. In a camping store, set the tent up, drag over some pads and sleeping bags to see how your sleeping bags will lay out, where you’ll put your clothes and boots at night, where you will store stuff that needs to stay dry, where you will cook breakfast if it’s pouring rain. Looking at the diagrams online is useful, but we’re often shocked by how different a tent is in reality than what we’d expected; and we try lots of new tents. It’s even harder for someone who hasn’t owned a bunch of tents to choose the right one without actually getting into it.
Here are some other factors you might want to consider:
Some tents are lighter than other, similar tents, but lighter often means less sturdy, less durable, and more expensive.
How fast and easy a tent goes up makes a big difference when you are setting it up in the rain or darkness is fast approaching. Some tents are easier to set up in general—but once you are used to a specific tent, most are easy enough. Practice makes perfect.

If you camp regularly on tent platforms, ledges or very rocky ground, you want a tent that doesn’t need a lot of stakes to hold it up. But if you camp on open hill tops, lake shores, beaches or small islands, you may need a tent with a lot of stakes to hold it in place in the wind. You’ll also want to get a tent footprint, which is a tarp cut to the dimensions of your tent. It adds weight, but keeps your expensive tent from being abraded or punctured by rocks or tent platform splinters.
If there are two of you using the tent, a door on both sides is an awfully nice feature, so no one has to crawl over someone else in the middle of the night to go look at the stars. Alternatively, a tent with a single front door where your head goes can work the same way, and the tapered shape will fit more places in the woods.
Spacious, easily-accessed vestibules between the fly and the tent can improve ventilation and provide extra space to cook and store gear in nasty weather. Be careful cooking in that space, though, as the vestibules slant down sharply to the ground; you don’t want to light your home on fire! NEVER cook with white gas in a vestibule area, as those stoves can produce a basketball-sized fireball during the warmup process; there really isn’t a safe way to do it.
Internal pockets may seem frivolous, but being able to find your headlamp and hygiene kit in the middle of the night is pretty crucial. Some tents have them at the ends of the tent, some overhead. Think about how you’re going to use the tent; for instance, if you and a buddy camp out often and sleep end-to-end, look for a tent that has pockets at each end.
Other details, like loops to hang an LED lantern or a clothesline, can make a tent a lot more user-friendly.
Step 5: Enjoy! This is the fun part. Set up the tent in your backyard a few times to practice and to make absolutely sure all the pieces are there, then start taking it out and enjoying those overnight outdoor adventures. When you come home, take it out, dry it, zip up all doors and windows, put it back in it’s stuff sack (put the fly in first, as that’s what you want to take out last when you’re setting it up) and be ready to go again at a moments notice. The right tent can be a happy home-away-from-home for many years to come.